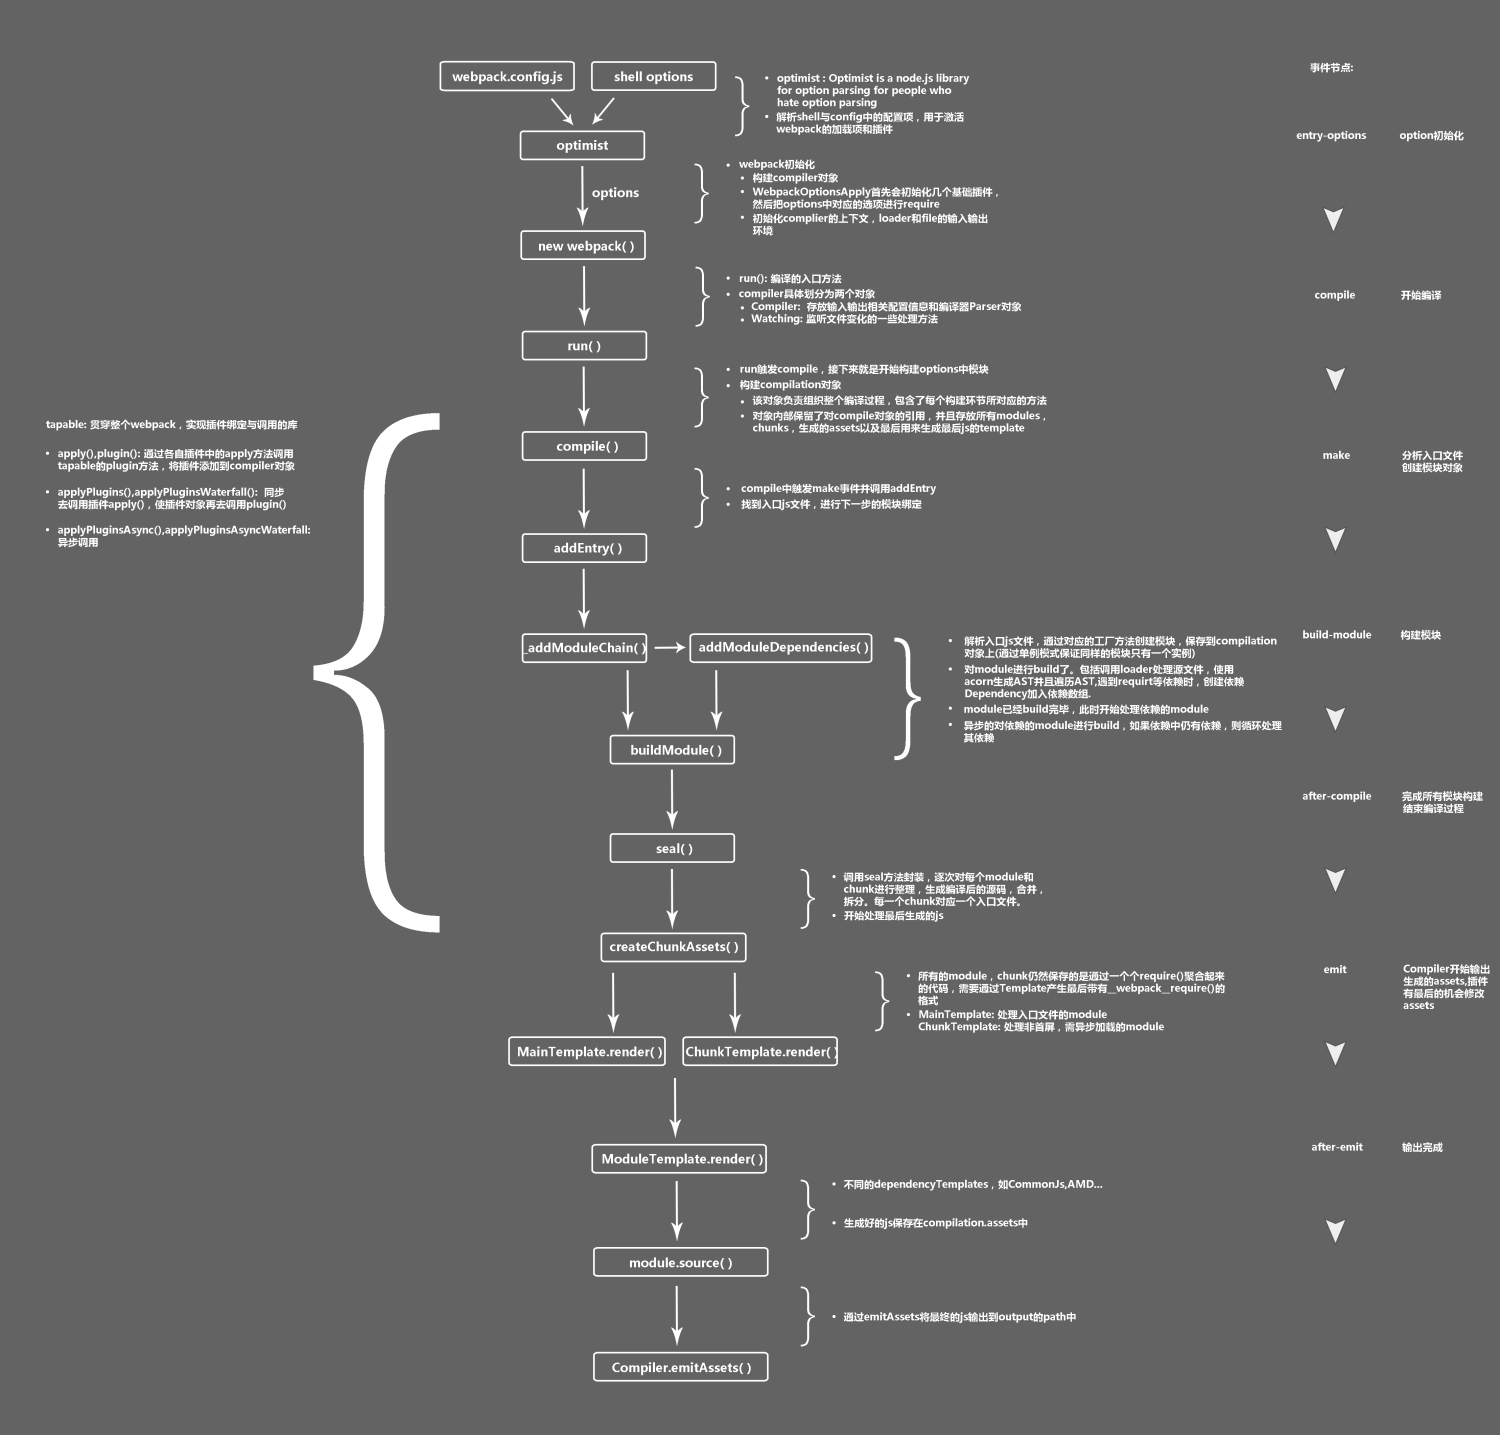
webpack的工作机制是基于事件流,将各个插件串联起来。实现这一切的核心就是tapable对象
Tapable
tapable 是一个类似于nodejs 的EventEmitter 的库,主要是控制钩子函数的发布与订阅,控制着webpack的插件系。webpack的本质就是一系列的插件运行。
1 | const { |
| 钩子名称 | 执行方式 | 说明 |
|---|---|---|
| SyncHook | 同步串行钩子 | 不关心监听函数的返回值,按照事件注册顺序依次执行 |
| SyncBailHook | 同步保险钩子 | 只要有一个监听函数返回不为空,则跳过之后剩下的所有监听函数 |
| SyncWaterfallHook | 同步瀑布流钩子 | 前一个监听函数的返回值会传递给下一个监听函数 |
| SyncLoopHook | 同步循环钩子 | 执行监听函数,当返回值为true时循环执行监听函数,直到返回值为undefined则退出循环执行下一个 |
| AsyncParallelHook | 异步并行钩子 | 哪个函数先执行完就先执行哪个函数,不关心监听函数的返回值 |
| AsyncParallelBailHook | 异步并行保险钩子 | 只要有一个监听函数返回不为空,则跳过之后剩下的所有监听函数直至 callAsync,调用它的回调函数 |
| AsyncSeriesHook | 异步串行钩子 | 不关心监听函数的返回值,但是必须执行回调函数,等所有函数执行完毕之后调用 callAsync 的回调函数 |
| AsyncSeriesBailHook | 异步串行保险钩子 | 异步执行监听函数,当有一个函数返回不为空时,则跳过后面的所有监听函数,直接调用 callAsync 的回调函数 |
| AsyncSeriesWaterfallHook | 异步串行瀑布流钩子 | 上一个监听函数的返回值可传递给下一个监听函数 |
compiler 和 compilation 对象
开发webpack插件最重要两个资源是对象:compiler和compilation,都是扩展了tapable对象
Compiler 对象
- 包含了 Webpack 环境所有的配置信息,包含 options,loaders,plugins 这些信息
- 这个对象在 Webpack 启动时候被实例化,它是全局唯一的
compilation 对象
- 包含了当前的模块资源、编译生成资源、变化的文件等
- 当 Webpack 以开发模式运行时,每当检测到一个文件变化,一次新的 Compilation 将被创建
- Compilation 对象也提供了很多事件回调供插件做扩展
两者的区别在于,Compiler代表了整个 webpack 从启动到关闭的生命周期,相当于webpack的一个执行者;而 compilation 只代表一次单独的编译。
compiler 事件钩子
| 事件钩子 | 触发时机 | 参数 | 类型 |
|---|---|---|---|
| entryOption | 在 entry 配置项处理过之后,执行插件 | SyncBailHook | |
| run | 开始读取记录之前 | compilation | AsyncSeriesHook |
| compile | 一个新的 compilation 创建之前 | compilation | SyncHook |
| compilation | compilation 创建之后 | compilation | SyncHook |
| make | 从 entry 开始递归分析依赖,准备对每个模块进行 build | compilation | AsyncParallelHook |
| after-compile | 编译(build)过程结束 | compilation | AsyncSeriesHook |
| emit | 生成资源到 output 目录之前 | compilation | AsyncSeriesHook |
| after-emit | 生成资源到 output 目录之后 | compilation | AsyncSeriesHook |
| asset-emitted | 生成文件的时候执行,提供访问产出文件信息的入口 | file、info | AsyncSeriesHook |
| done | 编译(compilation)完成 | stats | AsyncSeriesHook |
插件的组成
- 插件必须是一个函数,函数原型上需要定义 apply 方法或者是一个包含 apply 方法的对象,apply 方法的参数为compiler
- 完成自定义编译流程,处理compiltion对象的内部数据
- compiler hook 的 tap 方法的第一个参数应该是驼峰式命名的插件名称,建议是一个常量,以便在所有hook中重复使用
- 功能完成后调用 webpack 提供的回调
- 异步的事件需要调用 callback 回调,通知 Webpack 进入下一个流程,不然会卡住
1 | const pluginName = 'testWebpackPlugin' |
tap 函数
Tapable类暴露了tap、tapAsync和tapPromise方法,可以根据钩子的同步/异步方式来选择一个函数注入逻辑。
- tap 同步钩子
- tapAsync 异步钩子,通过callback回调告诉Webpack异步执行完毕
- tapPromise 异步钩子,返回一个Promise告诉Webpack异步执行完毕
tap
tap是一个同步钩子,同步钩子在使用时不可以包含异步调用,因为函数返回时异步逻辑有可能未执行完毕导致问题。
1 | compiler.hooks.compile.tap('MyWebpackPlugin', params => { |
tapAsync
tapAsync是一个异步钩子,我们可以通过callback告知Webpack异步逻辑执行完毕。
1 | compiler.hooks.emit.tapAsync('MyWebpackPlugin', (compilation, callback) => { |
tapPromise
tapPromise也是异步钩子,和tapAsync的区别在于tapPromise是通过返回Promise来告知Webpack异步逻辑执行完毕
1 | compiler.hooks.afterEmit.tapPromise('MyWebpackPlugin', (compilation) => { |
手写插件
从一个简单例子开始
1 | const pluginName = 'testWebpackPlugin' |
简易的 html-webpack-plugin
功能:将指定的html模板复制一份输出到dist目录下,同时会自动引入bundle.js
思路
编写一个自定义插件,注册afterEmit钩子
根据创建对象时传入的template属性来读取html模板
使用工具分析HTML,推荐使用cheerio,可以直接使用jQuery api
循环遍历webpack打包的资源文件列表,如果有多个bundle就都打包进去(可以根据需求自己修改,因为可能有chunk,一般只引入第一个即可)
输出新生成的HTML字符串到dist目录中
1 | const path = require('path') |
简易的 内联 inline-source-plugin
将外链的标签变成内联的,主要体现在
- 将
link标签变成style标签,然后里面填充的是引入的 css 的内容 - 将
script标签填充引入的script文件内容 - 删除掉已经生成的没必要引入的文件
思路:
找出
index.html中的link标签以及script标签,将其的innerHTML替换为对应文件的源码利用 html-webpack-plugin 插件提供的一些钩子,这里使用的是 alterAssetTagGroups,因为我们重点是在
head以及body上找标签- 关于 tag 标签提供了两个钩子
alterAssetTags、alterAssetTagGroups
1
2
3
4
5
6
7
8
9
10
11
12
13
14
15
16
17
18
19
20>alterAssetTags:
>AsyncSeriesWaterfallHook<{
assetTags: {
scripts: Array<HtmlTagObject>,
styles: Array<HtmlTagObject>,
meta: Array<HtmlTagObject>,
},
publicPath: string,
outputName: string,
plugin: HtmlWebpackPlugin
>}>
>alterAssetTagGroups:
>AsyncSeriesWaterfallHook<{
headTags: Array<HtmlTagObject | HtmlTagObject>,
bodyTags: Array<HtmlTagObject | HtmlTagObject>,
publicPath: string,
outputName: string,
plugin: HtmlWebpackPlugin
>}>1
2
3
4
5
6
7
8
9
10
11
12
13
14
15
16
17
18
19
20
21
22
23
24
25
26
27
28
29
30
31
32
33
34
35
36
37
38
39
40
41
42
43
44
45
46
47
48
49
50
51
52
53
54
55
56
57
58
59
60
61
62
63
64
65
66
67
68
69
70
71
72
73
74
75
76
77
78
79
80
81
82
83
84
85
86
87
88
89
90
91
92
93
94
95
96
97
98
99
100
101
102
103
104
105
106
107
108
109
110
111
112
113
114
115
116const pluginName = 'inlineSourcePlugin'
// 因为最后是改变 html 的 tag 然后插入到 html 中的,所以这里会使用到
// html-webpack-plugin 提供的一些 hooks 来供我们使用
// 在 html-webpack-plugin 的基础上开发插件
const HtmlWebpackPlugin = require('html-webpack-plugin')
class InlineSourcePlugin {
constructor({ test }) {
// 用于匹配文件的正则,这里主要寻找以 js 或 css 结尾的文件
this.reg = test
}
// 处理一个 tag 的数据
processTag(tag, compilation) {
let newTag, url
const { tagName, attributes } = tag
if (tagName === 'link' && this.reg.test(attributes.href)) {
newTag = {
tagName: 'style',
attributes: { type: 'text/css' }
}
url = attributes.href
}
if (tagName === 'script' && this.reg.test(attributes.src)) {
newTag = {
tagName: 'script',
attributes: { type: 'application/javascript', defer: "defer" }
}
url = attributes.src
}
if (url) {
// 标签里面插入对应文件的源码
newTag.innerHTML = compilation.assets[url].source()
// 既然都把源码怼 html 上了,就应该删除对应的文件
delete compilation.assets[url]
return newTag
}
return tag
}
// 处理引入 tags 的数据
processTags(data, compilation) {
const headTags = []
data.headTags.forEach(headTag => {
// 处理引入 css 的 link 标签
headTags.push(this.processTag(headTag, compilation))
})
const bodyTags = []
data.bodyTags.forEach(bodyTag => {
// 处理引入 script 标签
bodyTags.push(this.processTag(bodyTag, compilation))
})
return { ...data, headTags, bodyTags }
}
apply(compiler) {
compiler.hooks.compilation.tap(pluginName, (compilation) => {
console.log('The compiler is starting a new compilation...')
// 静态插件接口 | compilation | HOOK NAME | register listener
// 使用 alterAssetTagGroups 这个 hooks
HtmlWebpackPlugin.getHooks(compilation).alterAssetTagGroups.tapAsync(
'alterPlugin', // 为堆栈取名
(data, cb) => {
// 处理 html 的某些 tags, 这里需要做处理的是 css 和 js
const newData = this.processTags(data, compilation)
// 返回 data
cb(null, newData)
}
)
})
}
}
module.exports = InlineSourcePlugin
// weback 使用
const path = require('path')
const HtmlWebpackPlugin = require('html-webpack-plugin')
const MiniCssExtractPlugin = require('mini-css-extract-plugin')
const InlineSourcePlugin = require('./plugins/inlineSource-plugin')
module.exports = {
mode: 'development',
entry: './src/index.js',
output: {
filename: 'bundle.js',
path: path.resolve(__dirname, 'dist')
},
module: {
rules: [
{
test: /\.css$/,
use: [MiniCssExtractPlugin.loader, 'css-loader']
}
]
},
plugins: [
new MiniCssExtractPlugin({
filename: 'main.css'
}),
new InlineSourcePlugin({
test: /\.(js|css)/
}),
new HtmlWebpackPlugin({
template: './src/index.html',
inject: 'body'
}),
]
}- 关于 tag 标签提供了两个钩子