Egg-Cluster 多进程模型

背景

js 是单线程的,意味着一个 nodejs 进程只能运行在单个 cpu上面。nodejs 在 io 处理方面是非常优秀的,但是在密集运算型应用中仍然有不足之处,而解决的办法,就是利用多核cpu的并发优势,将 nodejs 进程运行在各个 cpu 上面。而 egg 为我们提供了 egg-cluster 模块,用于多进程管理以及进程间通信。

egg-cluster介绍

简单的说:

  • 在服务器上同时启动多个进程。
  • 每个进程里都跑的是同一份源代码(好比把以前一个进程的工作分给多个进程去做)。
  • 更神奇的是,这些进程可以同时监听一个端口。

其中:

  • 负责启动其他进程的叫做 Master 进程,他好比是个『包工头』,不做具体的工作,只负责启动其他进程。
  • 其他被启动的叫 Worker 进程,顾名思义就是干活的『工人』。它们接收请求,对外提供服务。
  • Worker 进程的数量一般根据服务器的 CPU 核数来定,这样就可以完美利用多核资源。

多进程模型

img

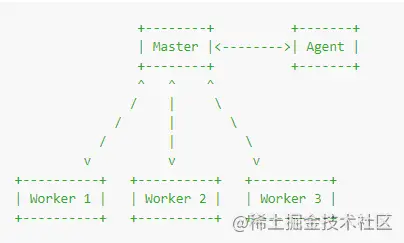
master 进程充当了进程管理的工作,不会运行任何业务代码,它负责 agent,worker 进程的 start,reload 工作以及进程间消息转发等工作。

为什么需要 agent 进程呢?

有些工作其实不需要每个 Worker 都去做,如果都做,一来是浪费资源,更重要的是可能会导致多进程间资源访问冲突。

Agent
在大部分情况下,我们在写业务代码的时候完全不用考虑 Agent 进程的存在,但是当我们遇到一些场景,只想让代码运行在一个进程上的时候,Agent 进程就到了发挥作用的时候了。 由于 Agent 只有一个,而且会负责许多维持连接的脏活累活,因此它不能轻易挂掉和重启,所以 Agent 进程在监听到未捕获异常时不会退出,但是会打印出错误日志,我们需要对日志中的未捕获异常提高警惕。

为什么不会端口冲突?

当 fork 进程时,明明代码中已经监听了一个端口,为什么 fork 时没有报端口占用?

cluster 的工作原理:通过进程间ipc通信传递句柄从而共享文件描述符

  1. 在 master-worker 模式中,创建子进程后,父子进程将会创建 ipc 通道,进程间通过 ipc 通道,使用 message 和 send 进行消息传递。用法如下:
1
2
3
4
5
6
7
8
9
10
11
// parent.js
var n = require('child_process').fork(__dirname + 'child.js')
n.on('message', function(m){
console.log('parent get msg:'+ m)
})
n.send({hello: 'world'})
// child.js
process.on('message', function(m){
console.log('child get msg' + m)
})
process.send({hello: 'world'})
  1. 为了解决端口不能重复监听的问题,在 nodev0.5.9 中引入了进程间发送句柄的功能(句柄是一种可以用来标识资源的引用,它的内部 包含了指向对象的文件描述符,比如句柄可以用来标识一个socket对象 ,一个UDP套接字,一个管道等)。send方法出了可以发送数据,还可以发送句柄。
1
child.send(params, [sendHandle])

详细用法:

1
2
3
4
5
6
7
8
9
10
11
12
13
// parent.js
var n = require('child_process').fork(__dirname + 'child.js')
var server = require('net').createServer();
server.listen(8080, function(){
n.send('server', server) // 发送句柄
})
// child.js
process.on('message', function(m, server){
server.on('connection', function(socket){
console.log('child get msg' + m)
socket.end('handle by child process')
})
})

通过传递 TCP server,我们可以发现,没有异常了,多个子进程可以监听同个端口 。

在 node 句柄发送的过程中,多个进程可以监听到相同的端口,而不引起 EADDRINUSE 异常,这是因为,我们独立启动的进程中,tcp 服务端套接字 socket 的文件描述符并不相同,导致监听相同的端口时会抛出异常,由于独立启动的进程互相之间并不知道文件描述符,所以监听相同端口就会失败,但对于 send() 发送的句柄还原出来的服务而言,他们的文件描述符是相同的,所以监听相同端口不会引起异常。

进程的启动顺序

egg-cluster/master.js 中承担了初始化,启动 agent 和 app 进程,检测状态等工作。我们看一下构造函数中的代码,整个流程在 constructor 中已经很好的提现出来了。

1
2
3
4
5
6
7
8
9
10
11
12
13
14
15
16
17
18
19
20
21
22
23
24
25
26
27
28
29
30
31
32
33
34
35
36
37
38
39
40
41
42
43
44
45
46
47
48
49
50
51
52
53
54
55
56
57
58
59
60
61
62
63
64
65
constructor(options) {
super();
this.options = parseOptions(options);
// new 一个 Messenger 实例
this.messenger = new Messenger(this);
// 借用 ready 模块的方法
ready.mixin(this);
this.isProduction = isProduction();
this.isDebug = isDebug();
...
...
// 根据不同运行环境(local、test、prod)设置日志输出级别
this.logger = new ConsoleLogger({ level: process.env.EGG_MASTER_LOGGER_LEVEL || 'INFO' });
...
}
// master 启动成功后通知 parent、app worker、agent
this.ready(() => {
this.isStarted = true;
const stickyMsg = this.options.sticky ? ' with STICKY MODE!' : '';
this.logger.info('[master] %s started on %s://127.0.0.1:%s (%sms)%s',
frameworkPkg.name, this.options.https ? 'https' : 'http',
this.options.port, Date.now() - startTime, stickyMsg);

const action = 'egg-ready';
this.messenger.send({ action, to: 'parent' });
this.messenger.send({ action, to: 'app', data: this.options });
this.messenger.send({ action, to: 'agent', data: this.options });
});
// 监听 agent 退出
this.on('agent-exit', this.onAgentExit.bind(this));
// 监听 agent 启动
this.on('agent-start', this.onAgentStart.bind(this));
// 监听 app worker 退出
this.on('app-exit', this.onAppExit.bind(this));
// 监听 app worker 启动
this.on('app-start', this.onAppStart.bind(this));
// 开发环境下监听 app worker 重启
this.on('reload-worker', this.onReload.bind(this));

// 监听 agent 启动,注意这里只执行一次
this.once('agent-start', this.forkAppWorkers.bind(this));
// master监听自身的退出及退出后的处理

// kill(2) Ctrl-C 监听 SIGINT 信号
process.once('SIGINT', this.onSignal.bind(this, 'SIGINT'));
// kill(3) Ctrl-\ 监听 SIGQUIT 信号
process.once('SIGQUIT', this.onSignal.bind(this, 'SIGQUIT'));
// kill(15) default 监听 SIGTERM 信号
process.once('SIGTERM', this.onSignal.bind(this, 'SIGTERM'));

// 监听 exit 事件
process.once('exit', this.onExit.bind(this));
// 监听端口冲突
detectPort((err, port) => {
/* istanbul ignore if */
if (err) {
err.name = 'ClusterPortConflictError';
err.message = '[master] try get free port error, ' + err.message;
this.logger.error(err);
process.exit(1);
return;
}
this.options.clusterPort = port;
this.forkAgentWorker(); // 如果端口没有冲突则执行该方法
});

master继承eventEmitter,使用发布订阅模式监听消息。 构造函数中的流程如下:

  1. 使用 detect-port 来获取空闲的端口
  2. forkAgentWorker 使用 child_process.fork() 来启动 agent 进程,启动后通过 process.send 通知 master agent 已经启动
1
2
3
4
agent.ready(() => {
agent.removeListener('error', startErrorHandler);
process.send({ action: 'agent-start', to: 'master' });
});
  1. forkAppWorkers: agent 启动后,通过 cluster.fork()启动 app_worker 进程。
1
2
// fork app workers after agent started
this.once('agent-start', this.forkAppWorkers.bind(this));

这里是使用了 cfork 模块,其本质也是 cluster.fork(),默认启动进程数为 os.cpu.length,也可以通过启动参数来指定 worker 进程的数量。

1
2
3
4
5
6
7
8
9
cfork({
exec: this.getAppWorkerFile(),
args,
silent: false,
count: this.options.workers,
// don't refork in local env
refork: this.isProduction,
windowsHide: process.platform === 'win32',
});

启动成功后,通过messenger告知master,worker进程已经ready

1
2
3
4
5
6
7
8
9
this.messenger.send({
action: 'app-start',
data: {
workerPid: worker.process.pid,
address,
},
to: 'master',
from: 'app',
});
  1. onAppStart: app worker 启动成功后通知 agent。并告知parent,egg-ready了,并带上 port,address,protocol 等参数
1
2
3
4
5
6
7
8
9
10
11
12
13
14
15
16
17
18
19
20
21
22
23
24
25
26
27
28
29
30
31
32
this.ready(() => {
this.isStarted = true;
const stickyMsg = this.options.sticky ? ' with STICKY MODE!' : '';
this.logger.info('[master] %s started on %s (%sms)%s',
frameworkPkg.name, this[APP_ADDRESS], Date.now() - startTime, stickyMsg);

const action = 'egg-ready';
this.messenger.send({
action,
to: 'parent',
data: {
port: this[REAL_PORT],
address: this[APP_ADDRESS],
protocol: this[PROTOCOL],
},
});
this.messenger.send({
action,
to: 'app',
data: this.options,
});
this.messenger.send({
action,
to: 'agent',
data: this.options,
});

// start check agent and worker status
if (this.isProduction) {
this.workerManager.startCheck();
}
});
  1. startCheck: 如果在生产环境,每隔10s检测 agent 和 worker,如有异常则上报。
1
2
3
4
5
6
7
8
9
10
11
12
13
14
15
16
17
// check agent and worker must both alive
// if exception appear 3 times, emit an exception event
startCheck() {
this.exception = 0;
this.timer = setInterval(() => {
const count = this.count();
if (count.agent && count.worker) {
this.exception = 0;
return;
}
this.exception++;
if (this.exception >= 3) {
this.emit('exception', count);
clearInterval(this.timer);
}
}, 10000);
}

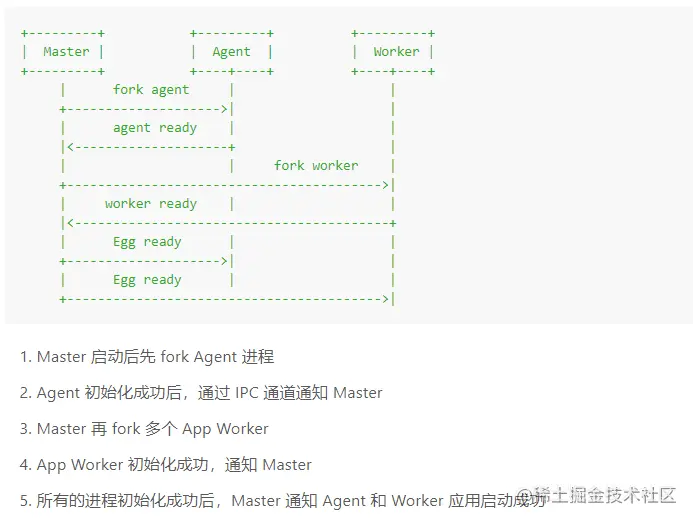
egg文档上的流程图很好的总结了以上过程:

img

进程间消息通讯

进程间通信原理(ipc)

IPC 的全称是 Inter-Process Communication,即进程间通信。

进程间通信的目的是为了让不同的进程能够互相访问资源,并进程协调工作。实现进程间通信的技术有很多,如命名管道、匿名管道、socket、信号量、共享内存、消息队列、Domain Socket 等。

node 中实现 IPC 通道的是管道技术(pipe)。在 node 中管道是个抽象层面的称呼,具体细节实现由 libuv 提供,在 win下是命名管道(named pipe)实现,在 Unix下,采用 unix Domain Socket 来实现。

Q:那么,进程间是如何通过 ipc 通道去链接的呢?

父进程在实际创建子进程前,会创建 IPC 通道并监听它,然后才真正创建出子进程,并通过环境变量(NODE_CHANNEL_FD)告诉子进程这个 IPC 通信的文件描述符。子进程在启动的过程中,根据文件描述符去连接这个已存在的 IPC 通道,从而完成父子进程之间的连接。

egg-cluster 中的进程间通信

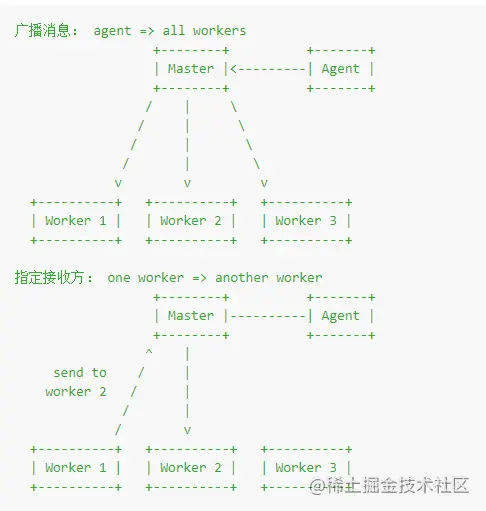
cluster 的 IPC 通道只存在于 Master 和 Worker/Agent 之间,Worker 与 Agent 进程互相间是没有的。那么 Worker 之间想通讯该怎么办呢?是的,通过 Master 来转发

img

在egg-cluster的源码中,封装了一个messageer类来处理进程间通信,代码传送门

1
2
3
4
5
6
7
8
9
10
11
12
13
14
15
16
17
18
19
20
21
22
23
24
25
26
27
28
29
30
31
32
33
34
35
36
37
38
39
40
41
42
43
44
45
46
47
48
49
50
51
52
53
54
55
56
57
58
59
60
61
62
63
64
65
66
67
68
69
70
71
/**
* master messenger,provide communication between parent, master, agent and app.
* ┌────────┐
* │ parent │
* /└────────┘\
* / | \
* / ┌────────┐ \
* / │ master │ \
* / └────────┘ \
* / / \ \
* ┌───────┐ ┌───────┐
* │ agent │ ------- │ app │
* └───────┘ └───────┘
*/
send(data) {
if (!data.from) {
data.from = 'master';
}

// recognise receiverPid is to who
if (data.receiverPid) {
if (data.receiverPid === String(process.pid)) {
data.to = 'master';
} else if (data.receiverPid === String(this.master.agentWorker.pid)) {
data.to = 'agent';
} else {
data.to = 'app';
}
}

// default from -> to rules
if (!data.to) {
if (data.from === 'agent') data.to = 'app';
if (data.from === 'app') data.to = 'agent';
if (data.from === 'parent') data.to = 'master';
}

// app -> master
// agent -> master
if (data.to === 'master') {
debug('%s -> master, data: %j', data.from, data);
// app/agent to master
this.sendToMaster(data);
return;
}

// master -> parent
// app -> parent
// agent -> parent
if (data.to === 'parent') {
debug('%s -> parent, data: %j', data.from, data);
this.sendToParent(data);
return;
}

// parent -> master -> app
// agent -> master -> app
if (data.to === 'app') {
debug('%s -> %s, data: %j', data.from, data.to, data);
this.sendToAppWorker(data);
return;
}

// parent -> master -> agent
// app -> master -> agent,可能不指定 to
if (data.to === 'agent') {
debug('%s -> %s, data: %j', data.from, data.to, data);
this.sendToAgentWorker(data);
return;
}
}
  1. app/agent -> master: 通过 master.emit(data.action, data.data) (master 继承自 EventEmitter)
  2. app/master/agent -> parent: process.send(data)
  3. parent/agent -> master -> app: sendmessage(worker, data)
  4. parent/agent -> master -> agent: sendmessage(this.master.agentWorker, data)

注: [sendmessage]是一个苏千大大写的一个用于处理进程间通信的module(Send a cross process message if message channel is connected.)

为什么多了一个parent?

原来,parent 就是 master 进程的 parent 进程,一般是 CLI,比如 egg-script start 和 egg-bin,egg-script 中通过('child_process').spawn 创建的 master 进程。child_process.spawn() 方法使用给定的 command 衍生一个新进程,并带上 args 中的命令行参数。同时,通过传递detached参数,可以使得在父进程退出后子进程继续执行。
spawn文档传送门

参考文章

理解Egg.js中的多进程模型(egg-cluster)